

Are you in the middle of pairing Powerbeats Pro to Laptop? Powerbeats Pro are versatile earbuds. These earbuds are like the Swiss Army knife of headphones—versatile, reliable, and oh-so-cool. Whether you’re jogging in the park or chilling at home, Powerbeats Pro has got you covered with top-notch audio quality and some nifty features.
But let’s get real for a sec. What’s the point of having these awesome earbuds if you can’t connect them to all your gadgets, right? Laptops included! Whether you’re a Windows user, a Surface Pro fan, or even an Android aficionado, we’ve got the lowdown on how to make Powerbeats Pro your go-to audio buddy for any device.
So, what’s in store for you in this article? HeadphonesTalk is diving deep into the how-tos, the step-by-steps, and even the “Oops, it’s not working!” moments. By the end, you’ll be a Powerbeats Pro pairing pro. So, stick around, and let’s get this audio party started!
Pairing Powerbeats Pro to Laptop: The Basics
Before we jump into the nitty-gritty of pairing your Powerbeats Pro with different types of laptops, let’s cover some basics. Trust me, you’ll want to make sure you’ve got these down to avoid any hiccups later on.
What You Need Before Starting the Pairing Process
- Powerbeats Pro Earbuds: Make sure they’re charged and ready to go. A low battery can mess up the pairing process.
- Laptop with Bluetooth Capability: Your laptop needs to have Bluetooth functionality. If it doesn’t, you’ll need an external Bluetooth USB adapter.
- A Quiet Space: It’s easier to focus and follow the steps if you’re in a quiet environment.
General Steps for Pairing Powerbeats Pro to Any Laptop
- Turn On Your Powerbeats Pro: Long-press the power button on your earbuds until you see a blinking light. This means they’re in “discoverable” mode and ready to connect.
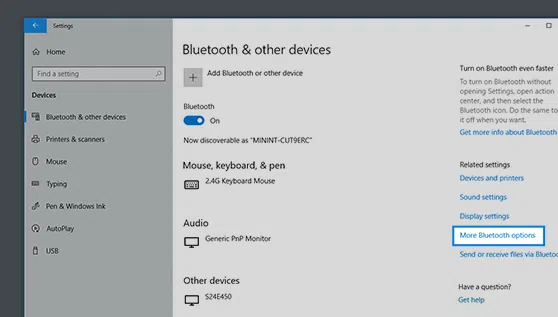
- Enable Bluetooth on Your Laptop: Go to your laptop’s settings to turn on Bluetooth. The exact steps might vary depending on your laptop’s operating system, but you’ll usually find this option in the settings menu under “Devices” or “Bluetooth and other devices.”

- Search for Devices: Once Bluetooth is on, your laptop will start searching for available devices. Look for “Powerbeats Pro” in the list and select it.
- Pair the Devices: After selecting “Powerbeats Pro,” you’ll usually get a prompt asking you to confirm the pairing. Click “Yes” or “Pair,” and you’re good to go!
And there you have it! Those are the basic steps to pair your Powerbeats Pro with any laptop. But stick around, because we’re going to dive into more specific scenarios and troubleshooting tips to make sure you’re all set, no matter what kind of laptop you have.
How to Pair Powerbeats Pro to a Dell Laptop
If you’re a Dell laptop user, you might be wondering how to get your Powerbeats Pro to play nice with your specific device. Don’t worry; we’ve got a tailored guide just for you. Let’s get into the step-by-step process to make sure you’re jamming to your favorite tunes in no time.
Specific Steps for Dell Laptops
- Turn On Your Powerbeats Pro: Hold down the power button on your earbuds for a few seconds until you see a blinking light. This means they’re ready to connect.
- Open Bluetooth Settings on Your Dell Laptop: Click on the Start menu and go to “Settings.” From there, navigate to “Devices” and then click on “Bluetooth & other devices.”
- Enable Bluetooth: If it’s not already on, toggle the Bluetooth switch to the “On” position.
- Add a New Device: Click on the “Add Bluetooth or other device” button. A new window will pop up.
- Select Bluetooth: In the new window, choose the “Bluetooth” option. Your Dell laptop will start searching for available devices.
- Pair with Powerbeats Pro: Once you see “Powerbeats Pro” appear in the list of available devices, click on it. You’ll likely get a prompt asking you to confirm the pairing. Go ahead and confirm.
- Successful Pairing: You’ll know the pairing is successful when you see a “Connected” or “Paired” status next to “Powerbeats Pro” in your Bluetooth settings.
Troubleshooting Common Issues with Dell Laptops
- Outdated Bluetooth Driver: If you’re having trouble connecting, your Bluetooth driver might be outdated. To update it, go to “Device Manager,” find your Bluetooth driver, right-click on it, and choose “Update driver.”
- Interference from Other Devices: Make sure there are no other Bluetooth devices nearby that could interfere with the pairing process.
- Check Battery Levels: If the earbuds aren’t connecting, the battery might be too low. Make sure your Powerbeats Pro are fully charged and try again.
- Restart Bluetooth: Sometimes, simply turning off the Bluetooth on your Dell laptop and turning it back on can solve connectivity issues.
- Consult Dell Support: If all else fails, it might be a good idea to reach out to Dell’s customer support for specialized assistance.
And there you have it! You should now be able to enjoy your Powerbeats Pro with your Dell laptop. But we’re not stopping here; read on for more tips and tricks for other types of laptops and common issues you might encounter.
Can You Connect Powerbeats Pro to an HP Laptop? Absolutely!
If you’re rocking an HP laptop, you might be curious if it’s possible to pair it with your Powerbeats Pro. The answer is a resounding “Yes!” Let’s walk through the steps to make sure you get that seamless audio experience you’re looking for.
Detailed Guide on Connecting Powerbeats Pro to HP Laptops
- Activate Your Powerbeats Pro: Start by holding down the power button on your Powerbeats Pro until you see a blinking light. This puts them in “discoverable” mode.
- Access Bluetooth Settings on Your HP Laptop: Click on the Start menu, then go to “Settings.” From there, choose “Devices” and then click on “Bluetooth & other devices.”
- Turn On Bluetooth: If Bluetooth isn’t already enabled, flip the switch to the “On” position.
- Add a Device: Click on the “Add Bluetooth or other device” button. A new window will appear.
- Choose Bluetooth: In the new window, select the “Bluetooth” option. Your HP laptop will start scanning for available devices.
- Select Powerbeats Pro: Once “Powerbeats Pro” shows up in the list, click on it. A prompt will likely appear asking you to confirm the pairing. Click “Yes” or “Pair.”
- Connection Confirmation: You’ll know you’re successfully connected when you see a “Connected” or “Paired” status next to “Powerbeats Pro” in your Bluetooth settings.
Tips for a Seamless Connection
- Keep Other Bluetooth Devices Away: Other Bluetooth devices can interfere with the pairing process. Make sure you’re in an area free from other Bluetooth gadgets.
- Check for Software Updates: Sometimes, updating your HP laptop’s software can improve Bluetooth connectivity. Make sure your system is up to date.
- Reboot if Necessary: If you’re facing issues, a simple reboot of both your Powerbeats Pro and HP laptop can often solve the problem.
- Check Battery Levels: Make sure your Powerbeats Pro are sufficiently charged. Low battery levels can disrupt the pairing process.
- Consult HP Support: If you’ve tried everything and it’s still not working, don’t hesitate to reach out to HP’s customer support for more specialized help.
And there you have it! You should be all set to enjoy your Powerbeats Pro with your HP laptop. But don’t go away just yet; we’ve got more helpful guides coming up for other types of laptops and troubleshooting tips.
Powerbeats Pro and Windows Laptops: A Perfect Match
If you’re a Windows laptop user, you’re in luck! Powerbeats Pro pairs wonderfully with Windows operating systems, offering a seamless audio experience whether you’re listening to music, watching videos, or taking calls. Let’s dive into how Powerbeats Pro works with Windows and the steps to get them paired up.
Pairing Powerbeats Pro to Laptop: How Powerbeats Pro Works with Windows OS
Powerbeats Pro uses Bluetooth technology to connect with your Windows laptop, just like it does with any other device. Once paired, you can enjoy all the features that Powerbeats Pro has to offer, such as:
- High-Quality Audio: Powerbeats Pro delivers crisp and clear sound, enhancing your Windows experience whether you’re on a Zoom call or jamming to your favorite playlist.
- Noise Cancellation: The earbuds come with a noise cancellation feature, allowing you to focus on your tasks without being disturbed by background noise.
- Easy Controls: You can control playback and volume directly from the earbuds, making it convenient to manage your audio without having to interact with your laptop.
- Multi-Device Support: Powerbeats Pro can remember multiple devices, so switching between your Windows laptop and other devices is a breeze.
Steps to Pair with a Windows Laptop
- Activate Discoverable Mode on Powerbeats Pro: Hold down the power button on your Powerbeats Pro until a blinking light appears, indicating they are in discoverable mode.
- Go to Windows Settings: Click on the Start menu and navigate to “Settings.” From there, choose “Devices.”
- Enable Bluetooth: If it’s not already on, toggle the Bluetooth switch to the “On” position.
- Add a New Device: Click on “Add Bluetooth or other device,” and a new window will pop up.
- Select Bluetooth: In the new window, click on the “Bluetooth” option. Your laptop will start searching for available Bluetooth devices.
- Choose Powerbeats Pro: Once you see “Powerbeats Pro” listed among the available devices, click on it. A prompt will appear asking you to confirm the pairing. Click “Yes” or “Pair” to proceed.
- Check Connection Status: You’ll know the pairing is successful when you see a “Connected” or “Paired” status next to “Powerbeats Pro” in your Bluetooth settings.
And that’s it! You’re now ready to enjoy all the benefits of using Powerbeats Pro with your Windows laptop. Stay tuned for more tips and tricks on how to get the most out of your Powerbeats Pro, no matter what device you’re using.
Adding Powerbeats Pro to Your Laptop: It’s Easier Than You Think
Hey, not everyone is a tech wizard, and that’s totally okay! If the thought of pairing devices makes you break out in a cold sweat, don’t worry. We’ve got a super easy, no-fuss guide to help you add Powerbeats Pro to your laptop’s device list. Trust us, it’s simpler than you think!
A Simplified Guide for Those Who Are Not Tech-Savvy
- Turn On Your Earbuds: Find the power button on your Powerbeats Pro and hold it down until you see a light blinking. This means they’re ready to connect.
- Go to Your Laptop’s Settings: Look for a gear icon, usually found at the bottom left corner of your screen, and click on it. This will open up your laptop’s settings.
- Find the Bluetooth Option: You’ll see a bunch of options like “System,” “Devices,” and so on. Click on “Devices.”
- Turn On Bluetooth: You’ll see a switch that says “Bluetooth.” If it’s not already on, click it to turn it on.
- Add Device: Right next to the Bluetooth switch, you’ll see an option that says “Add Bluetooth or other device.” Click on it.
- Choose Bluetooth: A new window will pop up with a few options. Click on the one that says “Bluetooth.”
- Select Powerbeats Pro: Your laptop will start looking for devices to connect to. When you see “Powerbeats Pro,” click on it.
- Confirm: A message will pop up asking if you want to pair the devices. Click “Yes” or “Pair,” and you’re all set!
Quick Steps to Add Powerbeats Pro to Your Device List
- Turn on Powerbeats Pro (look for blinking light).
- Open laptop settings (click the gear icon).
- Click on “Devices.”
- Turn on Bluetooth.
- Click “Add Bluetooth or other device.”
- Choose “Bluetooth” in the new window.
- Select “Powerbeats Pro” from the list.
- Confirm the pairing.
See? Adding Powerbeats Pro to your laptop is a piece of cake! Now you can enjoy your favorite tunes, podcasts, or whatever you like to listen to, without any hassle.
Can Powerbeats Pro Connect to Any Laptop? Debunking Myths
There’s a lot of chatter out there about what devices Powerbeats Pro can or can’t connect to. Let’s set the record straight and debunk some common myths about Powerbeats Pro and laptop compatibility.
Addressing Common Misconceptions About Device Compatibility
- Only for Apple Devices: One of the biggest myths is that Powerbeats Pro is exclusively for Apple devices. That’s not true! They use Bluetooth technology, which means they can connect to any device with Bluetooth capabilities, including Windows and Linux laptops.
- Needs Special Software: Some people think you need special software to pair Powerbeats Pro with non-Apple devices. Nope, all you need is a Bluetooth-enabled device.
- Complicated Setup: Another misconception is that setting up Powerbeats Pro with a laptop is complicated. As we’ve shown in previous sections, it’s actually quite straightforward.
- Limited Features on Non-Apple Devices: While it’s true that some features are optimized for Apple devices, the core functionalities like audio playback and volume control work perfectly fine on all compatible devices.
List of Laptops That Are Compatible with Powerbeats Pro
- Apple MacBook Series: MacBook Air, MacBook Pro, MacBook
- Windows Laptops:
- Dell: Inspiron, XPS, Latitude
- HP: Pavilion, Envy, Spectre, EliteBook
- Lenovo: ThinkPad, IdeaPad, Yoga
- Asus: ZenBook, ROG, VivoBook
- Acer: Aspire, Predator, Swift
- Microsoft: Surface Laptop, Surface Pro
- Dell: Inspiron, XPS, Latitude
- Linux Laptops:
- System76: Lemur Pro, Galago Pro
- Dell: XPS 13 Developer Edition
- Lenovo: ThinkPad X1 Carbon with Linux pre-installed
- System76: Lemur Pro, Galago Pro
- Chromebooks:
- Google Pixelbook
- Samsung Chromebook
- Acer Chromebook
- Google Pixelbook
So, the bottom line is, if your laptop has Bluetooth, you can pretty much guarantee it will work with Powerbeats Pro. Now that we’ve cleared the air, you can go ahead and enjoy your Powerbeats Pro with whatever laptop you have!
How to Connect My Powerbeats Pro to My Laptop: Personal Experiences
Sometimes, the best advice comes from people who’ve been there, done that. We’ve gathered some real-life testimonials and personal stories from users who’ve successfully paired their Powerbeats Pro with their laptops. Plus, they’ve shared some handy tips and tricks they’ve picked up along the way.
Sharing User Testimonials and Personal Stories
- Sarah, College Student: “I was super nervous about connecting my new Powerbeats Pro to my old Dell laptop. But it was surprisingly easy! Now I can listen to my study playlists without any wires getting in the way.”
- Mike, Office Worker: “I use my Powerbeats Pro for work calls on my HP laptop. The noise cancellation feature is a lifesaver in my noisy home office. The setup was a breeze, and I didn’t need any special software.”
- Emily, Fitness Enthusiast: “I love using my Powerbeats Pro when I’m doing home workouts. I was thrilled to find out they easily connected to my MacBook, so now I can follow along with workout videos without getting tangled in cords.”
- Raj, Tech Blogger: “I’ve tried connecting Powerbeats Pro to various laptops, including a Linux machine. The process is pretty much the same across the board. The sound quality is consistently good, and the ear hooks keep them secure even when I’m moving around a lot.”
Tips and Tricks Learned from Real-Life Experiences
- Check for Updates: Before you start the pairing process, make sure your laptop’s Bluetooth drivers are up to date. This can help avoid any connectivity issues.
- Close Proximity: Keep your Powerbeats Pro close to your laptop during the initial pairing process to ensure a quick and smooth connection.
- Battery Check: Always make sure your Powerbeats Pro are sufficiently charged before pairing. A low battery can sometimes cause issues.
- Forget Previous Devices: If you’ve previously connected your Powerbeats Pro to other devices, it might be a good idea to ‘forget’ those devices in your Bluetooth settings before pairing with a new one.
- Reboot as a Last Resort: If all else fails, rebooting both the Powerbeats Pro and the laptop has solved the problem for many users.
So there you have it—real stories and practical tips from people who’ve successfully connected their Powerbeats Pro to their laptops. Hopefully, their experiences can help make your own setup process a little easier!
Connecting Powerbeats Pro to a Surface Laptop: A Special Case
If you’re a Surface laptop user, you might be wondering how the pairing process with Powerbeats Pro works for you. While Surface laptops run on Windows OS like many other laptops, there are some unique aspects to consider. Let’s dive into the specifics.
Specific Guide for Surface Laptop Users
- Activate Your Powerbeats Pro: Just like with any other device, start by holding down the power button on your Powerbeats Pro until you see a blinking light. This means they’re ready to connect.
- Open Action Center: On your Surface laptop, swipe in from the right edge of the screen to open the Action Center. Alternatively, you can click the Action Center icon located at the bottom right corner of your screen.
- Go to All Settings: In the Action Center, click on the “All Settings” tile to open the Settings window.
- Navigate to Devices: In the Settings window, click on “Devices.”
- Enable Bluetooth: If Bluetooth is off, click the switch to turn it on.
- Add a New Device: Click on “Add Bluetooth or other device,” and a new window will pop up.
- Select Bluetooth: In the new window, click on “Bluetooth.”
- Choose Powerbeats Pro: Your Surface laptop will start scanning for available devices. Once “Powerbeats Pro” appears, click on it to start the pairing process.
- Confirm Pairing: A message will appear asking you to confirm the pairing. Click “Yes” or “Pair,” and you’re good to go!
How It Differs from Other Windows Laptops
- Action Center: Surface laptops have an Action Center that provides a quick way to access settings, which is a bit different from the traditional Start menu approach on other Windows laptops.
- Touchscreen Capabilities: If you’re using a Surface laptop with touchscreen features, you can navigate through the pairing process using touch gestures, making it even more convenient.
- Surface Pen: For those who use a Surface Pen, you can use the pen to navigate through the settings, offering another level of ease in the setup process.
- Built-in Drivers: Surface laptops often come with the latest drivers pre-installed, making the Bluetooth connectivity process smoother compared to some older Windows laptops.
By following these steps and tips, you should have no trouble connecting your Powerbeats Pro to your Surface laptop. Enjoy the freedom of wireless audio on your specialized device!
How to Connect Powerbeats Pro to Laptop with Windows 11: The Latest Update
Windows 11 is here, and it’s brought some changes to the table, including how Bluetooth devices like Powerbeats Pro are paired. If you’ve upgraded to Windows 11 or bought a new laptop with the latest OS, you might be curious about how to connect your Powerbeats Pro. Let’s break it down.
What’s New in Windows 11 for Bluetooth Pairing
- Simplified Interface: Windows 11 has a more streamlined and user-friendly interface, making it easier to navigate through settings, including Bluetooth.
- Quick Settings: The new Quick Settings menu allows for faster access to essential settings like Bluetooth, making the pairing process quicker.
- Enhanced Compatibility: Windows 11 has improved Bluetooth stack, offering better compatibility and a more stable connection with various devices, including Powerbeats Pro.
Steps to Connect Powerbeats Pro to a Windows 11 Laptop
- Activate Your Powerbeats Pro: Hold down the power button on your earbuds until you see a blinking light. This means they’re ready to pair.
- Access Quick Settings: On your Windows 11 laptop, click on the network icon in the taskbar to open Quick Settings.
- Enable Bluetooth: In the Quick Settings menu, you’ll see a Bluetooth icon. Click on it to turn Bluetooth on if it’s not already activated.
- Go to Bluetooth Settings: Click on the “Bluetooth & devices” option in Quick Settings to open the full Bluetooth menu.
- Add a Device: In the Bluetooth settings, click on the “+ Add device” button to start the pairing process.
- Select Bluetooth in the Dialog: A dialog box will appear with different types of devices you can add. Choose “Bluetooth.”
- Pair with Powerbeats Pro: Your laptop will start scanning for available Bluetooth devices. Once you see “Powerbeats Pro” on the list, click on it.
- Confirm the Pairing: A message will pop up asking you to confirm the pairing. Click “Yes” or “Pair,” and you’re all set!
So, if you’re on Windows 11, these are the steps you’ll need to follow to get your Powerbeats Pro connected. The new OS makes it a bit easier and more straightforward, so you’ll be jamming to your favorite tunes in no time!
Conclusion
We’ve covered a lot of ground in this article, from the basics of pairing Powerbeats Pro with various types of laptops to addressing myths and sharing real-life experiences. Whether you’re using a Dell, HP, Surface, or a laptop with the latest Windows 11, connecting your Powerbeats Pro should be a breeze if you follow the guides we’ve laid out for you.
Final Thoughts and Encouragement
Powerbeats Pro offers excellent sound quality, noise cancellation, and the freedom of a wireless experience. Don’t let the fear of a new tech setup hold you back from enjoying these benefits. As you’ve seen, the process is usually straightforward, and even if you run into issues, troubleshooting steps are often simple.
Call to Action: Share Your Own Experiences and Tips
We’d love to hear from you! If you’ve successfully paired your Powerbeats Pro with your laptop, or if you’ve faced and overcome challenges, your experiences could help others. So go ahead and share your stories, tips, and tricks in the comments section below. Let’s make this a community where we can all learn from each other!
So, what are you waiting for? Grab your Powerbeats Pro, and tell us pairing Powerbeats Pro to Laptop experience and step into a world of high-quality, wireless audio.
Additional Resources
The pairing guide from Apple can be found here.
Powerbeats Pro Windows 10 guide can be found here.