

If you’re looking for a premium audio experience with immersive sound, look no further than the Beats Studio Pro. These wireless, over-ear headphones combine powerful Active Noise Cancellation (ANC), sleek design, and intuitive controls for the ultimate listening journey.
Understanding Beats Studio Pro Controls is essential for a seamless music experience. It empowers you to adjust sound modes, play/pause tracks, activate your voice assistant, and more – all without breaking your flow. Think of it like learning the controls of a high-end sports car – once you know how to handle it, the ride gets way more thrilling.
While these headphones are generally user-friendly, some users do encounter occasional hiccups with controls. That could be anything from the volume control acting up to noise cancellation not working as expected. Don’t worry, most of these issues are easily resolvable, and mastering Beats Studio Pro Controls will help you troubleshoot them like a pro.
Beats Studio Pro Controls
Mastering Beats Studio Pro Touch Controls
Let’s ditch the buttons and dive into the world of sleek and intuitive touch controls on your Beats Studio Pro headphones.
What are Beats Studio Pro touch controls?
The magic happens on the smooth outer surface of each earcup. There are no physical buttons to press here. Instead, these surfaces act as responsive touchpads, recognizing various taps and swipes to perform different functions. This design keeps things looking streamlined and allows for effortless adjustments on the fly.
How to control playback using touch gestures:
Here’s where things get fun. It’s time to learn the gestures that command your Beats Studio Pro:
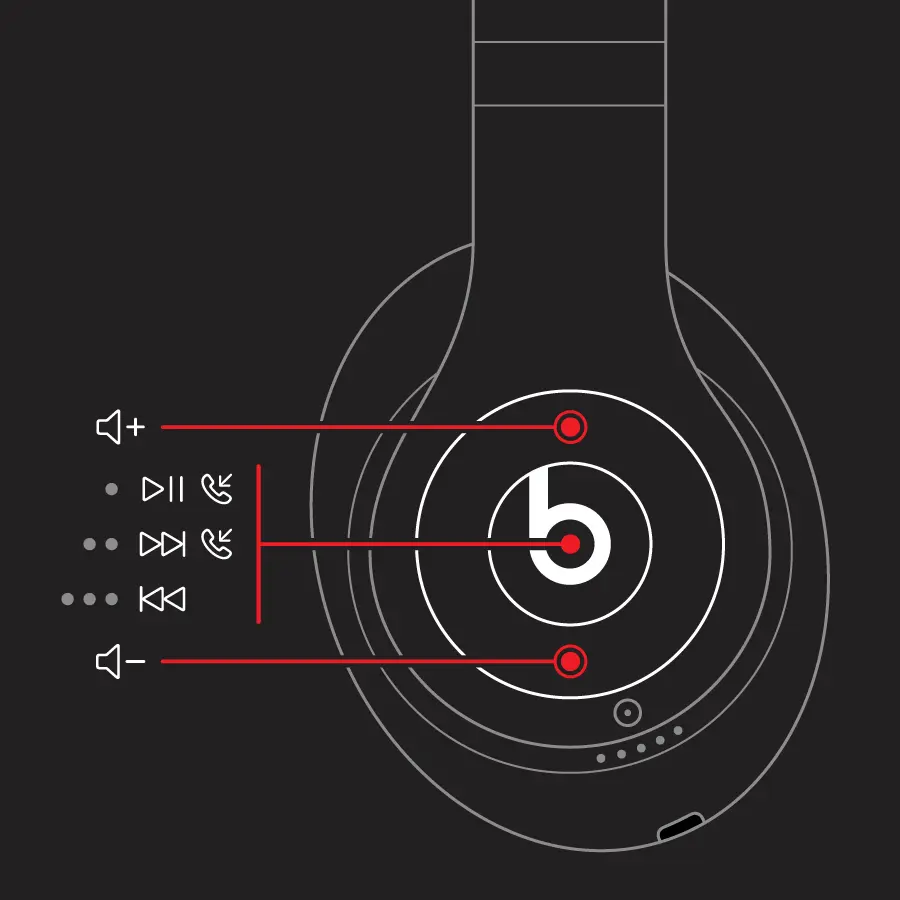
- Play/Pause: A simple single tap on the center of either earcup will play or pause your audio. It’s like giving your music a quick “hello” or “time out”.
- Skip Tracks (Forward/Backward): Ready for the next song? Double-tap the center of the right earcup to skip forward a track. Want to revisit a previous gem? Double-tap the center of the left earcup to jump back.
- Activate Siri/Google Assistant: Need help managing your playlists or getting directions? A long press on the center of either earcup calls up your phone’s trusty voice assistant.
How to adjust volume using touch controls
Forget fumbling with your phone; control the volume directly from your Beats Studio Pro:
- Volume Up: Swipe upwards on the right earcup to crank up the sound.
- Volume Down: Swipe downwards on the right earcup to lower the volume.
Pro Tip: Think of those swipes as mimicking the movement of a volume slider on your screen – up for louder, down for quieter.
Why Touch Controls Rock
- Convenience: Adjust your music without taking your phone out of your pocket.
- Seamless Music Experience: Make changes without interrupting your listening flow.
- Sleek Design: Touch controls contribute to the modern, minimalist look of the Beats Studio Pro headphones.
Important Note: If you want to customize touch control functions, some options may be available within the Beats app or your phone’s Bluetooth settings. For example, you might be able to assign the long-press action to a different task than activating your voice assistant.
Understanding Beats Studio Pro Button Controls
While touch controls are awesome, let’s not forget the power of those trusty physical buttons on your Beats Studio Pro. There are two main players here, strategically located to give you quick access to essential functions.
The Functions of the Beats Studio Pro Buttons
- The System Button (Underside of Right Earcup): This small but mighty button handles several core tasks:
- Powering On/Off: Press and hold the system button for about a second to power your Beats Studio Pro headphones on. Repeat the same process to turn them off. You’ll hear a friendly little sound effect to confirm.
- Pairing Mode: Want to pair Beats Studio Pro to a new device? Press and hold the system button for about five seconds until the LED indicator starts blinking. This means your headphones are ready to be discovered by other Bluetooth devices.
- Powering On/Off: Press and hold the system button for about a second to power your Beats Studio Pro headphones on. Repeat the same process to turn them off. You’ll hear a friendly little sound effect to confirm.
- The Noise Control Button (Left Earcup): This button is your key to controlling the way you experience the world around you:
- Switching Modes: Each press of this button cycles between Active Noise Cancellation (ANC), Transparency Mode, and Off.
- Switching Modes: Each press of this button cycles between Active Noise Cancellation (ANC), Transparency Mode, and Off.
How to turn Beats Studio Pro on and off
As mentioned earlier, it’s all about the system button:
- Turning On: Press and hold the system button (located on the underside of the right earcup) for roughly one second. A sound will signal that your headphones are awake.
- Turning Off: Repeat the same process of pressing and holding the system button for one second.
How to switch between ANC and Transparency modes
Tap into the noise control button on your left earcup:
- Active Noise Cancellation (ANC): ANC is your go-to when you want to block out distractions and immerse yourself in the music.
- Transparency Mode: This mode allows some outside sound to filter in, so you can stay aware of your surroundings while still enjoying your tunes. Perfect for walks or commuting.
- Off: This turns both ANC and Transparency Mode off.
How to pair Beats Studio Pro with different devices
- Put them in Pairing Mode: Press and hold the system button for about five seconds. The LED light will start blinking, indicating your Beats Studio Pro is ready to mingle.
- Go to Bluetooth Settings: Access the Bluetooth settings on your desired device (phone, laptop, etc.).
- Find and Select: Scan for available Bluetooth devices. Your Beats Studio Pro should appear in the list. Select it to pair.
Pro Tips:
- Some devices (especially Apple products) offer a streamlined pairing experience due to Apple’s special chip inside Beats Studio Pro.
- For Android users, make sure to download the Beats app from the Google Play Store for extra control options and firmware updates.
Beats Studio Pro Volume Control
Let’s explore how to fine-tune the volume on your Beats Studio Pro headphones – because the right volume level makes all the difference. Whether you want those beats booming or a subtle background soundtrack, you’ve got multiple ways to get things just right.
How to control Beats Studio Pro headphone volume
You have two main methods at your disposal:
- Touch Controls:
- Volume Up: Gently swipe upwards on the outer surface of the right earcup.
- Volume Down: Swipe downwards on the outer surface of the right earcup. Think of these gestures as mimicking a virtual volume slider.
- Volume Up: Gently swipe upwards on the outer surface of the right earcup.
- The System Button: While not its primary function, the system button also provides quick volume adjustments:
- Volume Up: Press the system button (underside of the right earcup) once.
- Volume Down: Press the system button twice in quick succession.
- Volume Up: Press the system button (underside of the right earcup) once.
How to adjust volume from your connected device
Sometimes it’s easier to grab your phone or computer and make the volume changes directly. Your Beats Studio Pro will happily obey. Just use your device’s standard volume controls, and the changes will be mirrored on your headphones.
How to utilize the Beats app for volume customization (if applicable)
The Beats app (available on both iOS and Android) provides additional options and insights, depending on your device:
- Android: While you won’t find direct volume controls within the Android Beats app, you often have the option to switch between noise control modes with a press-and-hold gesture on your headphones. The Beats app allows you to reassign this long-press action to volume control instead. Now you have yet another way to adjust the volume!
- iOS: If you’re using your Beats Studio Pro with an Apple device, the Beats app might offer some limited volume-related settings buried deeper in its menus. Keep in mind that these aren’t extensive, and your primary volume controls will still be on your iPhone/iPad.
Important Notes
- Check your device settings: Sometimes, your phone or computer may have safety features like volume limits in place. Check your device’s audio settings if you’re having trouble getting the volume level you want.
- The magic of balance: Aim for a comfortable listening volume that protects your hearing. Excessively loud music over prolonged periods can cause damage.
Troubleshooting Volume Issues
If your Beats Studio Pro volume controls aren’t behaving as expected, try these steps:
- Restart: A simple restart of both your headphones and connected device can sometimes clear up temporary glitches.
- Check the connection: Confirm a strong Bluetooth connection between your Beats Studio Pro and your device.
- Look for updates: Make sure you have the latest firmware updates for your headphones and check if your device’s operating system is up-to-date.
Beats Studio Pro Noise Control
Get ready to transform how you experience sound. Your Beats Studio Pro headphones aren’t just about delivering music; they actively shape your listening environment with two powerful tools: Active Noise Cancellation (ANC) and Transparency Mode.
What are Active Noise Cancellation (ANC) and Transparency Mode?
- Active Noise Cancellation (ANC): Think of ANC as your personal noise-canceling ninja. It uses tiny microphones on your Beats Studio Pro to detect external noises – airplane engines, traffic, chatty coworkers – and cleverly generates an “anti-noise” signal to cancel those distractions out. The result? A blissful cocoon of sound where your music shines.
- Transparency Mode: Sometimes, you need to be a bit more tuned in to the world around you. Transparency Mode selectively lets in external sounds, so you can carry on a conversation, hear announcements, or stay alert on a busy street – all without removing your headphones.
How to switch between ANC and Transparency modes
It’s as easy as pressing the dedicated Noise Control button on the left earcup of your Beats Studio Pro.
- One press: Cycle from ANC to Transparency Mode.
- Another press: Cycle from Transparency Mode to Off (disabling both ANC and Transparency).
- One more press: Back to ANC, completing the cycle.
How to customize noise control settings in the Beats App (If applicable)
The Beats app (for both Android and iOS) might provide extra options depending on your device and the features Apple has enabled:
- iOS: Apple devices tend to offer more integration. You might be able to customize which noise control modes are included when you cycle through them with the Noise Control button. For example, you could choose to have only ANC and Off but skip Transparency Mode.
- Android: While customization options can be more limited on Android, the Beats app can at least give you a visual indication of which noise control mode you’re currently using.
When to Use Each Mode:
- ANC: Ideal for when you want to block distractions and fully immerse yourself in music, podcasts, or have some focused quiet time. Perfect for noisy commutes, flights, or workspaces.
- Transparency Mode: Great for situations where you need to stay aware of your surroundings, such as walking down a street, waiting for announcements in an airport, or having quick conversations.
- Off: Use this when you want to prolong battery life or simply prefer a completely natural listening experience without any electronic sound processing.
Pro Tips:
- Experiment and find what works best for different situations. You might love ANC for a long flight but Transparency Mode for a quick walk around the block.
- If you primarily use your Beats Studio Pro with Apple devices, explore the available noise control settings directly within your iOS Bluetooth menu.
Troubleshooting Common Control Issues
Even the most amazing headphones can have the occasional hiccup. Let’s tackle those pesky times when your Beats Studio Pro controls seem to have a mind of their own. Don’t worry; most of these issues are easily solved with a bit of troubleshooting.
Beats Studio Pro volume control not working
When the volume just won’t budge, try these steps:
- Potential Causes:
- Software Glitch: Technology sometimes needs a refresh.
- Low Battery: Your headphones might be running low on power.
- Device Volume: Your phone or computer’s volume could be set too low.
- Bluetooth Connection Issue: A spotty Bluetooth connection can interfere with controls.
- Software Glitch: Technology sometimes needs a refresh.
- Solutions:
- The Basic Reboot: Restart your Beats Studio Pro headphones and your connected device. It’s a classic fix for a reason!
- Check Your Source Volume: Ensure the volume is turned up on the device (phone, laptop, etc.) that’s playing your music.
- Battery Boost: If the battery level on your Beats Studio Pro is low, plug them in and charge Beats Studio Pro.
- Software Updates: Check for firmware updates for your headphones (often done through the Beats app) and updates for your device’s operating system. If updates are available then update your Beats Studio Pro.
- Reset: If the above steps don’t work, consider performing a full reset of your Beats Studio Pro headphones. Check how to reset Beats Studio Pro.
- The Basic Reboot: Restart your Beats Studio Pro headphones and your connected device. It’s a classic fix for a reason!
Beats Studio Pro noise control not working
If ANC or Transparency mode isn’t behaving as expected, explore these solutions:
- Potential Causes
- Microphone Issues: ANC relies on microphones picking up external noise – make sure they aren’t blocked.
- Incorrect Settings: Double-check you’re in the intended mode.
- Software Glitch: Sometimes the software needs a reboot.
- Microphone Issues: ANC relies on microphones picking up external noise – make sure they aren’t blocked.
- Solutions:
- Setting Confirmation: Ensure you’re actually cycling to the correct mode by pressing the noise control button.
- Clean Microphones: Gently clean the microphone areas on your headphones with a soft cloth, removing any dust or debris that might obstruct them.
- Restart: Give your Beats Studio Pro and your connected device a fresh start.
- Reset: In persistent cases, try resetting your Beats Studio Pro.
- Setting Confirmation: Ensure you’re actually cycling to the correct mode by pressing the noise control button.
Beats Studio Pro headphone controls not responding
When your taps, swipes, and button presses are ignored, consider these causes and fixes:
- Potential Causes:
- Connectivity Issues: A weak or unstable Bluetooth connection is often the culprit.
- Software Glitch Technology has its moods, and a simple reset can sometimes work wonders.
- Connectivity Issues: A weak or unstable Bluetooth connection is often the culprit.
- Solutions
- Bluetooth Check: Make sure your Beats Studio Pro are securely connected to your device. Go to your device’s Bluetooth settings and confirm the connection. Try disconnecting and reconnecting if needed.
- Restart: Try the classic power-cycle fix for both your headphones and connected device.
- Reset: If nothing else helps, perform a reset of your Beats Studio Pro to restore default settings.
- Bluetooth Check: Make sure your Beats Studio Pro are securely connected to your device. Go to your device’s Bluetooth settings and confirm the connection. Try disconnecting and reconnecting if needed.
Important Notes
- Cleanliness is key: Keep your Beats Studio Pro clean, especially the touch-sensitive areas and microphone grilles.
- Updates matter: Regularly check for app updates and firmware updates. These can often address bugs and performance issues.
- When in doubt, reset: Resetting your headphones is a more drastic step, but it can often clear up stubborn problems.
How to Control Beats Studio Pro Like a Pro
You’re already familiar with the basics of Beats Studio Pro controls, but let’s elevate your mastery and take your listening experience to the next level.
Tips for memorizing Beats Studio Pro controls
- Practice makes perfect: Don’t just read about the controls – get hands-on! Wear your headphones and practice those taps, swipes, and button presses until they become second nature. A few minutes a day will make a difference.
- Visualize: Create a mental image of the controls. Imagine the touch surfaces on the earcups and picture yourself making the gestures. Associate the button locations with their functions.
- Make it a game: Turn memorization into a playful challenge. Put on some music, close your eyes, and try to adjust the volume, skip tracks, or change noise control modes without looking.
Using Beats Studio Pro controls with voice assistants
Voice assistants like Siri and Google Assistant can streamline your experience even further:
- Summon your assistant: A long press on either earcup activates your phone’s voice assistant. Now you have an extra way to control things without taking your phone out.
- Ask for what you want: Use voice commands to play specific songs, start playlists, control volume (“Hey Siri, turn up the volume”), change noise control modes (“Hey Google, activate Transparency Mode”), or even get the weather forecast, all without lifting a finger from your Beats.
Maximizing your experience with Beats Studio Pro controls
- Personalize when possible: Explore any customization options available in your device’s Bluetooth settings or the Beats app. Perhaps you can change what a touch-and-hold gesture does or select which noise control modes are cycled through as you press the dedicated button.
- Keep it clean: To ensure reliable touch control performance, gently wipe the outer surfaces of your Beats Studio Pro earcups with a soft cloth from time to time to remove fingerprints or smudges.
- Experiment and discover: Play around with your headphones while listening to different types of music and in various environments. Notice how your ideal volume and noise control settings change with the situation.
- Embrace the convenience: Once you master the controls, enjoy the seamless way they let you adjust your audio experience without interrupting your flow, whether you’re grooving along on a commute, focusing on work, or just chilling out.
Conclusion
By now, you’re well on your way to becoming a Beats Studio Pro control ninja! Let’s recap the key takeaways:
- Touch Controls: These sleek controls on the earcups let you play/pause, adjust volume, skip tracks, and activate your voice assistant – all with simple taps and swipes.
- Button Controls: Mastering the system button (power, pairing) and noise control button (ANC, Transparency) expands your control options.
- Volume Control: Combine touch controls, button presses, and your device’s settings for ultimate volume management.
- Noise Control: Effortlessly switch between Active Noise Cancellation and Transparency Mode to tune your listening environment perfectly.
- Troubleshooting: Basic steps like restarting, checking settings, and ensuring clean microphones often solve common control issues.
Mastering Beats Studio Pro controls isn’t just about knowing what to do; it’s about unlocking a smoother, more intuitive listening experience. No more fumbling with your phone or getting distracted by unwanted noise. The music becomes your focus.
So, practice those gestures, personalize your settings when possible, and soon you’ll be adjusting Beats Studio Pro controls like a second language. Enjoy the elevated control and the enhanced enjoyment it brings to your music!